
How to prepare, erect, and strike formwork correctly is a core skill that every building technician must master. This guide explains each stage of the formwork process step by step, helping technicians produce accurate concrete elements safely and efficiently.
Introduction: Why Correct Formwork Practice Matters
Formwork holds fresh concrete until it hardens. Moreover, it shapes the concrete, controls its dimensions, and determines its surface finish. Consequently, any error in preparation, erection, or striking shows up directly in the finished structure.
In addition, formwork carries heavy loads. Wet concrete exerts enormous pressure, and a failed formwork system can collapse without warning. Therefore, technicians must follow a defined sequence at every stage. As a result, they protect both the workforce and the quality of the work.
This guide therefore covers the three main phases: preparation, erection, and striking.
Phase 1: Preparation of Formwork
Preparation begins long before the first panel is lifted. In fact, good preparation prevents most problems that arise during erection and casting.
Step 1: Study the Working Drawing
First, read the working drawing carefully. Identify the element to be cast, its dimensions, levels, and reinforcement details. Moreover, confirm the formwork type specified for that element.
Pay particular attention to:
- The plan dimensions and heights.
- The positions of openings and inserts.
- The specified concrete cover.
- Any special finish requirements.
Step 2: Select the Formwork Materials
Next, select materials that suit the element and the project. For instance, use plywood panels for smooth wall finishes, and timber for small or irregular elements. Furthermore, confirm that panels are large enough to minimise the number of joints.
Step 3: Inspect Materials and Accessories
Inspect every panel, board, prop, and accessory before use. Consequently, reject any item that shows:
- Warping, splitting, or delamination.
- Corrosion on steel panels or props.
- Damaged threads on tie rods.
- Cracked or bent props.
Defective materials cause leakage, misalignment, and collapse. Therefore, never use them.
Step 4: Clean and Treat the Formwork
Clean all contact surfaces before assembly. Remove old concrete, nails, and debris. Then, apply a release agent evenly across the surface.
As a result, the formwork strips cleanly, and the concrete surface remains smooth. In addition, re-apply the agent if assembly disturbs the coating.
Step 5: Prepare the Foundation or Base
Formwork must bear on a firm, level base. Therefore, compact the ground or slab where props and panels will sit. Moreover, place sole plates under props to spread the load.
If the base is soft or sloping, correct it before erection. Consequently, the formwork remains stable throughout casting.
Step 6: Set Out the Formwork Position
Next, set out the formwork outline on the ground or slab. Use a tape measure, line, and builder’s square. Furthermore, mark centrelines and edge lines clearly.
Accurate setting out ensures the concrete element lands in the correct position. Therefore, check dimensions and diagonals before proceeding.
Step 7: Prepare Reinforcement and Inserts
Confirm that reinforcement is in place and correctly spaced. In addition, fix spacers and cover blocks so the steel maintains the specified cover. Moreover, position any inserts, sleeves, or cast-in items before erection closes them in.
Step 8: Organise Tools and Access
Finally, assemble all tools and equipment before work begins. Confirm that PPE is available and worn. In addition, provide safe access to the work area, such as a scaffold or working platform.
Phase 2: Erection of Formwork
Erection turns the prepared materials into a stable mould. Moreover, the sequence matters, because each member supports the next.
Step 1: Erect the First Side or Face
Start with one face of the formwork. Position the panels and fix them loosely at first. Then, check alignment and level before tightening.
Step 2: Install Tie Rods and Spacers
Next, install tie rods through the panels. Tie rods resist the lateral pressure of wet concrete. In addition, place spacers to maintain the correct wall thickness.
Tighten the tie rods evenly so the panels remain parallel. Consequently, the formwork resists pressure without bulging.
Step 3: Erect the Opposite Face
Now erect the opposite face and connect it to the tie rods. Check that the two faces are parallel and that the cavity width matches the drawing.
Step 4: Install Walings and Soldiers
Walings and soldiers stiffen the panels and distribute pressure. Therefore, fix them horizontally and vertically at the specified spacing. Moreover, tighten all clamps and bolts firmly.
Step 5: Brace the Formwork
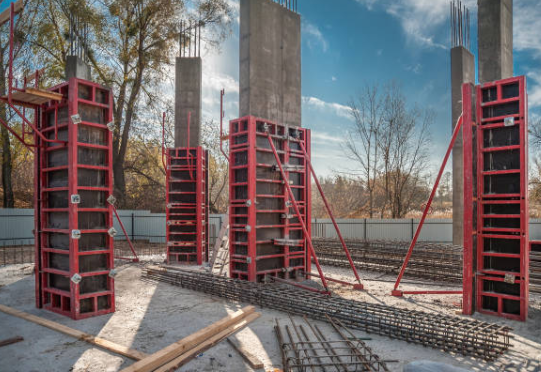
Bracing prevents movement during casting. Therefore, install push-pull props or inclined braces on both faces. Furthermore, anchor the braces to a firm base.
For column formwork, brace all four faces and support each face with a sloping prop. In addition, space the braces as specified in the drawing.
Step 6: Check Plumbness, Squareness, and Level
Now check the formwork geometry. Use a plumb bob or spirit level to verify verticality. Use a tape measure to check diagonals for squareness. Moreover, check levels at the base and top.
Correct any error before casting. Consequently, the finished element meets tolerance.
Step 7: Support Slabs and Beams
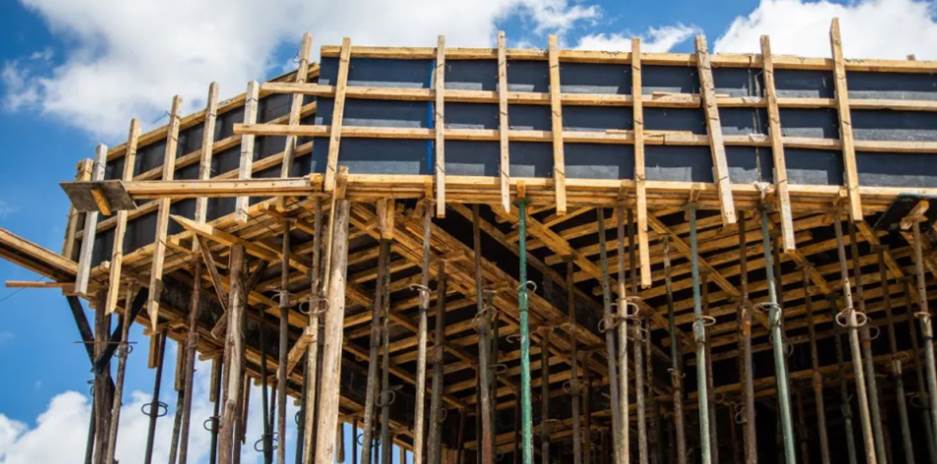
For slabs and beams, erect props and bearers first. Then, lay joists across the bearers and fix the soffit panels on top. Moreover, adjust the props to the correct level and camber.
Step 8: Seal Joints
Seal all joints to prevent mortar loss. Use tape, fillets, or tightly fitted joints. As a result, the concrete surface stays free from honeycombing.
Step 9: Final Inspection Before Casting
Finally, carry out a full inspection. Check dimensions, supports, ties, braces, joints, and cleanliness. In addition, confirm that release agent covers all surfaces.
Only after a satisfactory inspection should casting proceed. Therefore, record the inspection and report any defect.
Phase 3: Striking (Removal) of Formwork
Striking means removing the formwork after the concrete hardens. Moreover, timing and technique determine whether the concrete surface survives intact.
Step 1: Confirm the Concrete Has Gained Strength
First, confirm that the concrete has reached sufficient strength. Therefore, follow the specified curing periods:
- Vertical faces (walls, columns) – strip after 24 to 48 hours.
- Soffits of beams and slabs – strip after 7 to 14 days, depending on span and load.
- Long-span props – leave longer, or re-prop as designed.
Step 2: Prepare the Area Below
Next, clear the area below the formwork. Remove tools, materials, and debris. In addition, place props or temporary supports where required.
Step 3: Release the Supports Gradually
Now release the supports slowly. First, loosen the wedges and push-pull props. Then, lower the adjustable props in small increments.
Never release all supports at once. Consequently, the concrete takes the load gradually rather than suddenly.
Step 4: Remove Panels from the Top Downward
Remove panels from the top downward. Moreover, use a wrecking bar carefully to prise panels away. Avoid shock loads, because they damage the concrete surface.
Step 5: Remove Tie Rods and Accessories
Next, remove tie rods, clamps, and spacers. Furthermore, collect them in a container so they are not lost. In addition, fill the tie holes as specified.
Step 6: Remove Props and Bearers
Then, remove props and bearers from below. Work in a planned sequence so the structure is never left unsupported. Moreover, follow the designer’s instructions for re-propping.
Step 7: Clean and Store the Formwork
After removal, clean each panel immediately. Remove concrete and old release agent. Then, repair minor damage and store the formwork under cover on bearers.
As a result, the formwork remains ready for the next cycle. Furthermore, proper storage extends its service life.
Step 8: Inspect the Finished Concrete
Finally, inspect the finished concrete surface. Note any defects such as honeycombing, bulging, or misalignment. In addition, record the defects for repair and for future improvement.
Step-by-Step Summary Table
| Phase | Step | Key Point |
| Preparation | Study drawing | Confirm dimensions and type |
| Preparation | Select materials | Match material to element |
| Preparation | Inspect materials | Reject defective items |
| Preparation | Clean and treat | Apply release agent evenly |
| Preparation | Prepare base | Firm, level, and supported |
| Preparation | Set out position | Check dimensions and diagonals |
| Preparation | Prepare reinforcement | Fix spacers and inserts |
| Preparation | Organise tools | Assemble tools and PPE |
| Erection | Erect first face | Fix loosely, then align |
| Erection | Install ties and spacers | Tighten evenly |
| Erection | Erect opposite face | Keep faces parallel |
| Erection | Install walings | Fix at specified spacing |
| Erection | Brace formwork | Brace all faces firmly |
| Erection | Check geometry | Plumb, square, and level |
| Erection | Support slabs | Props, bearers, and joists |
| Erection | Seal joints | Prevent mortar loss |
| Erection | Final inspection | Check before casting |
| Striking | Confirm strength | Follow curing periods |
| Striking | Prepare area below | Clear and support |
| Striking | Release supports | Gradually, not all at once |
| Striking | Remove panels | Top downward, no shock |
| Striking | Remove accessories | Collect and fill tie holes |
| Striking | Remove props | Planned sequence |
| Striking | Clean and store | Ready for next cycle |
| Striking | Inspect concrete | Record defects |
Common Mistakes to Avoid
Many formwork failures begin with simple errors. Therefore, avoid the following common mistakes.
- Using warped or damaged panels.
- Skipping the release agent.
- Leaving gaps that leak mortar.
- Under-designing props and braces.
- Bearing props on soft or sloping ground.
- Stripping formwork too early.
- Releasing all supports at once.
- Overloading the formwork during casting.
- Neglecting inspection before the pour.
- Storing formwork in the open, exposed to rain.
Conclusion
Correct formwork practice follows three clear phases: preparation, erection, and striking. When technicians prepare materials and bases properly, erect the formwork accurately, and strike it at the right time, they achieve safe construction and good concrete quality.
Moreover, each phase depends on the one before it. Therefore, skipping a step in preparation creates problems during erection, and rushing the striking damages the finished work. As a result, discipline and sequence are the technician’s most valuable tools.
Frequently Asked Questions
What are the three main phases of formwork work?
The three phases are preparation, erection, and striking. Preparation covers materials, base, and setting out. Erection covers assembly, bracing, and inspection. Striking covers removal, cleaning, and storage.
When should formwork be struck?
Strike vertical faces after 24 to 48 hours. Strike beam and slab soffits after 7 to 14 days, depending on span and loading. Always follow the specification.
Why must supports be released gradually?
Gradual release allows the concrete to take the load slowly. Releasing all supports at once causes shock loading, which can crack or damage the structure.
What should I check before casting?
Check dimensions, supports, ties, braces, joints, cleanliness, and release agent coverage. Only proceed after a satisfactory inspection.
How should formwork be stored after striking?
Clean each panel, repair minor damage, and store it under cover on bearers. This approach extends service life and keeps the formwork ready for reuse.