
How to erect and dismantle timbering safely is a critical skill in building construction, especially when excavating trenches and pits. This guide explains the safe erection and dismantling of timbering step by step, helping building technicians understand each stage of the operation and the risks involved.
Introduction: Why Safe Erection and Dismantling of Timbering Matters
Timbering supports the sides of trenches and excavations to prevent soil collapse. If erected incorrectly, earth pressure can cause the timbering to fail, leading to serious accidents. Similarly, if dismantled too quickly, it can trigger sudden soil movement that endangers workers and completed structures.
Therefore, both erection and dismantling must follow a defined sequence. No step should be skipped or reversed. Every stage directly affects the stability of the system and the safety of everyone on site.
Preparation Before Erecting Timbering
Before any timbering member is placed, several preparatory steps must be completed. Without these steps, the work carries unnecessary risk.
Step 1: Read and Interpret the Working Drawing
First, the technician should study the working drawing carefully. Identify each component of the timbering system, including:
- Poling boards – vertical members that resist earth pressure directly.
- Walings – horizontal members that transfer earth pressure to the struts.
- Struts – compression members that span the excavation width.
- Wedges – tapered pieces used for tightening and adjustment.
The drawing specifies the size, spacing, and position of each member.
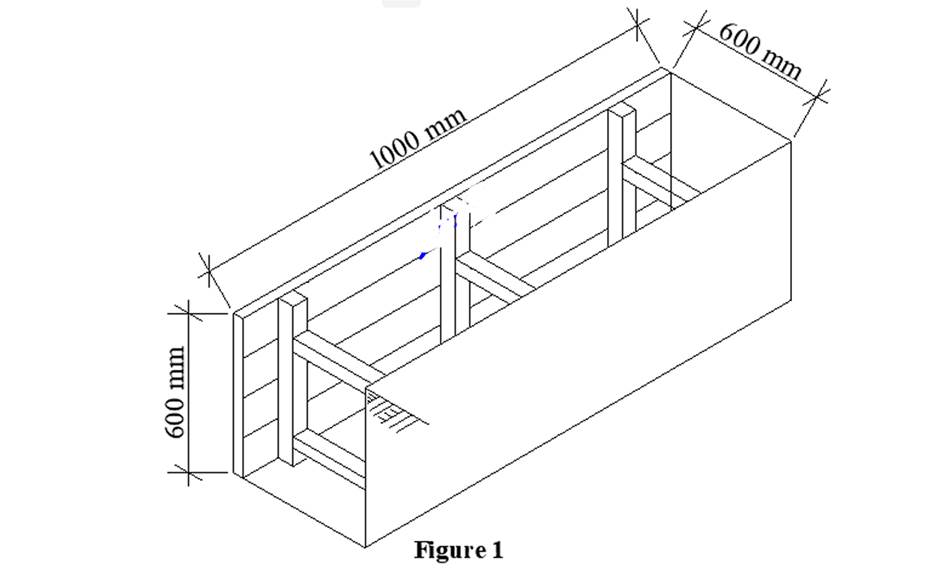
Step 2: Check Tools and Materials
Next, confirm that all required tools are available and in good condition. Common tools include:
- Tape measure, try square, spirit level, plumb bob
- Handsaw, hammer, sledgehammer
- Personal protective equipment (helmet, safety boots, gloves, overall)
For materials, inspect the timber for cracks, decay, or severe distortion. Defective timber must never be used for load-bearing members.
Step 3: Inspect the Excavation and Surroundings
After excavation, check the stability of the trench walls. At the same time, confirm whether there is spoil or equipment loading near the trench edge. According to safety regulations, excavated soil should not be placed within 0.5 metres of the trench edge. Heavy equipment should also be kept away from the excavation to avoid additional lateral loads.
If the trench exceeds 1.5 metres in depth, protective measures are mandatory. If it exceeds 4 metres, a qualified engineer must design the support system.
Steps for Erecting Timbering
The core principle of erecting timbering is erect as you dig. Support work must proceed together with excavation, not after the trench is fully dug.
Step 4: Install Poling Boards
Poling boards are the first members to contact the soil. Install them vertically and tight against the trench wall, with boards placed as closely together as possible.
In loose soil, the lower ends of poling boards should be sharpened so they can be driven progressively as excavation advances. This method, known as the “driving method,” suits unstable ground.
Step 5: Install Walings
Walings are placed horizontally against the outer face of the poling boards. They transfer earth pressure to the struts. Walings must remain horizontal, and their larger dimension should be placed horizontally to resist bending.
The vertical spacing of walings normally does not exceed 0.9 metres (about 3 feet). The exact size depends on the soil type and trench depth.
Step 6: Install Struts and Wedges
Struts are compression members that span the trench. Workers place them between opposing walings. When installing struts, tighten them using wedges. Use wedges in pairs so they can be adjusted later and released in a controlled manner during dismantling.
Determine the horizontal and vertical spacing of struts from OSHA tabulated data or site-specific engineering design. For example, in Type A soil, a trench 13 feet deep and 5 feet wide may use 4×4 struts at 6 feet horizontal spacing and 4 feet vertical spacing.
Step 7: Check Plumbness and Tightness
After erection, check the plumbness of poling boards using a plumb bob. Check the horizontality of walings using a spirit level. At the same time, inspect each wedge to confirm it is tight, and check struts for looseness or displacement.
If you find any slack, re-tighten it immediately. In loose soil, timbering may loosen because of soil movement or timber shrinkage as it dries. Therefore, re-check the system regularly.
Steps for Dismantling Timbering
Dismantling timbering (also called “striking”) is more dangerous than erection because earth pressure is already acting on the members. Removal must be gradual, never in one go.
Step 8: Confirm Dismantling Conditions
Before dismantling, confirm the following conditions:
- Permanent structures in the trench (such as foundations or pipes) have reached sufficient strength.
- Backfill material is ready.
- The site supervisor has approved the removal.
Step 9: Dismantle from Bottom to Top
The dismantling sequence is the reverse of erection. Start at the bottom of the trench and work upward, layer by layer.
Specifically, knock out the wedges of the lowest strut first so the timbering loosens slightly but does not fall away. Then backfill part of the soil to support the exposed area. Next, remove the next layer of struts.
This process is called backfill as you dismantle. Its purpose is to maintain support to the soil at all times and prevent sudden collapse.
Step 10: Use Wedges for Controlled Release
The paired-wedge design exists precisely to allow controlled release. During dismantling, tap one end of the wedge gently to ease it out rather than knocking the strut away directly. This gradually reduces the support force and allows you to observe whether the soil is moving.
If the soil begins to move, stop dismantling immediately, re-tighten the wedges, and assess whether additional support is needed.
Step 11: Backfill and Compact
After removing each layer of support, backfill and compact immediately. Distribute the backfill evenly on both sides of the trench to avoid one-sided loading. For foundation trenches, return earth to both sides of the walling and ram it solid. This approach prevents displacement of masonry or concrete.
Step 12: Remove and Inspect Timber Members
As timber members come out, inspect each one. Separate members that are sound from those that are damaged. Timber that has sustained impact damage, excessive deflection, or significant decay should not be reused for load-bearing shoring.
Step 13: Complete Housekeeping
Finally, assemble, clean, and store all tools according to the nature of the work. Clear the site of debris and surplus timber. Good housekeeping reduces trips, falls, and material loss.
Safety Precautions During Erection and Dismantling
Safety must guide every operation. Therefore, apply the following precautions at all times.
First, wear the correct PPE for the task. Second, keep tools sharp and in good condition. Third, never use a damaged tool or defective timber. Fourth, avoid taking heavy machines near the excavation. Fifth, use warning tapes or lights during excavation exercises. Sixth, keep the work area tidy to prevent trips and falls. Finally, report any defective tool or unsafe condition to the supervisor immediately.
In addition, never allow workers to enter an unsupported trench. Moreover, never remove a strut before the layer below it is ready to take the load.
Common Mistakes to Avoid
Many timbering failures begin with poor practice. Therefore, avoid the following common mistakes.
- Digging the full depth before installing any support.
- Using undersized or defective timber.
- Failing to tighten wedges properly.
- Removing struts from the top downward.
- Removing several struts at once instead of one layer at a time.
- Backfilling on one side only.
- Leaving tools or spoil at the trench edge.
- Ignoring signs of soil movement.
Step-by-Step Summary Table
| Stage | Action | Key Point |
| 1 | Read working drawing | Identify all members and dimensions |
| 2 | Check tools and materials | Reject defective timber and tools |
| 3 | Inspect excavation | Keep spoil and equipment away from edge |
| 4 | Install poling boards | Tight against wall, sharpen for driving |
| 5 | Install walings | Horizontal, larger dimension horizontal |
| 6 | Install struts and wedges | Tighten with paired wedges |
| 7 | Check plumbness and tightness | Re-tighten any slack |
| 8 | Confirm dismantling conditions | Permanent works strong, backfill ready |
| 9 | Dismantle bottom to top | Reverse of erection sequence |
| 10 | Use wedges for controlled release | Tap gently, observe soil |
| 11 | Backfill and compact | Even on both sides |
| 12 | Remove and inspect timber | Do not reuse damaged members |
| 13 | Complete housekeeping | Clean and store tools |
Conclusion
Safe erection and dismantling of timbering depend on sequence, patience, and vigilance. When technicians follow the correct order—erect as you dig, dismantle from the bottom up, and backfill as you go—they protect both themselves and the surrounding structures.
Moreover, regular inspection and prompt re-tightening keep the system stable throughout the excavation period. On the other hand, shortcuts and careless removal cause collapses that are entirely preventable. Therefore, treat every step as essential, and never rush the process.
Frequently Asked Questions
What is the correct order for erecting timbering?
Install poling boards first, then walings, then struts and wedges. Always erect as you dig, not after excavation is complete.
Why is dismantling more dangerous than erection?
Earth pressure is already acting on the members during dismantling. Therefore, removal must be gradual to prevent sudden soil movement.
Should timbering be removed from top to bottom or bottom to top?
Remove from the bottom upward, layer by layer. This is the reverse of the erection sequence.
What should I do if the soil moves during dismantling?
Stop immediately, re-tighten the wedges, and assess whether additional support is needed.
Can damaged timber be reused for timbering?
No. Timber with impact damage, excessive deflection, or decay must not be reused for load-bearing shoring.