
How to erect and dismantle building shores safely is a core skill that every building technician must master before supporting any structure or excavation. This guide explains the safe erection and dismantling of building shores step by step, helping technicians understand each stage of the operation and the risks involved.
Introduction: Why Safe Erection and Dismantling of Building Shores Matters
Building shores support structures and excavations that have become unstable. Moreover, they carry the weight of walls, floors, and soil that could otherwise collapse. Consequently, a shore that is erected incorrectly endangers everyone nearby.
In addition, dismantling is even more hazardous than erection. At that stage, the shore is under full load, and premature removal causes sudden structural movement. Therefore, technicians must follow a defined sequence at every stage.
This guide therefore covers preparation, erection, and dismantling in detail, with safety tips throughout.
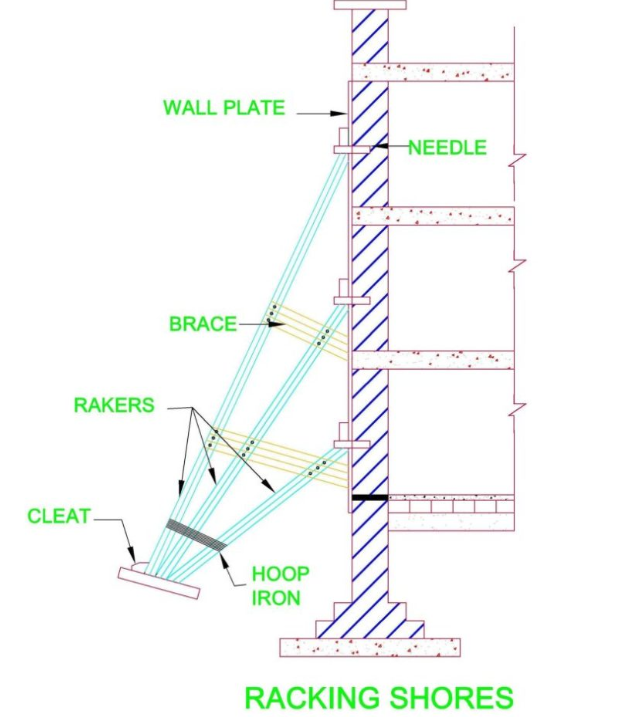
Preparation Before Erecting Building Shores
Before any shore is placed, several preparatory steps must be completed. Without these steps, the work carries unnecessary risk.
Step 1: Inspect the Structure or Excavation
First, inspect the structure or excavation to determine the extent of instability. Identify the causes of movement, such as subsidence, vibration, or foundation failure.
Moreover, check the condition of walls, floors, and foundations. Record any cracks, bulges, or settlement. Then, decide whether shoring is the correct solution.
Step 2: Determine the Shoring Type
Next, select the shoring type that suits the condition. For instance, raking shores suit external wall support, while dead shores suit opening formation. Furthermore, flying shores suit parallel walls after intermediate removal.
Consider the span, load, and access conditions. In addition, consult a qualified engineer for complex or high-risk situations.
Step 3: Select and Inspect Materials
Then, select shoring materials that meet strength requirements. Timber shoring uses posts, wales, struts, and sheeting. Steel and aluminum systems offer alternative options.
For timber, use scaffold-grade or structural-grade lumber. Moreover, inspect all members for defects before use. Consequently, reject any member that shows splits, rot, or excessive warping.
Step 4: Prepare the Foundation
Shoring must bear on firm, level ground. Therefore, prepare sole plates or sleepers to spread the load.
The vertical uprights should rest on a sleeper or sole piece as long and wide as can be conveniently used. In addition, take care not to place a sleeper on a cellar arch or floor without ensuring it will carry the added load.
Step 5: Prepare Tools and PPE
Next, gather all tools and PPE. Inspect each item and reject anything damaged. Moreover, confirm that jacks, clamps, and spanners work correctly.
Provide PPE including helmets, safety boots, gloves, goggles, high-visibility vests, and fall protection harnesses.
Step 6: Plan the Sequence and Brief the Team
Then, plan the erection sequence and brief the team. Identify who will do what, and agree on signals. Furthermore, plan the dismantling sequence at the same time, because the two are linked.
Safety Tips Before You Start
Safety tips keep the operation controlled and predictable. Therefore, apply the following from the outset.
- Work from a safe position – never stand beneath an unsupported wall.
- Keep the area clear – remove tools, debris, and obstructions.
- Erect from the top down – this keeps the structure supported as work proceeds.
- Never overload props – match the shore to the load.
- Watch for movement – stop work if cracks widen or walls shift.
- Use proper access – build temporary stairways with railings, not ladders where possible.
- Communicate clearly – use agreed signals when lifting and tightening.
- Check the weather – avoid work in high winds or heavy rain.
Methods of Erecting Building Shores
Different shore types use different erection methods. Therefore, technicians must follow the method suited to the system.
Method 1: Erecting Raker (Inclined) Shores
Raker shores support vertical or near-vertical walls externally. Therefore, follow this sequence:
- Install the sole plate on firm ground.
- Position the wall plate against the wall at approximately two-thirds of its height.
- Install the raker at an angle between 30 and 60 degrees.
- Tighten the connection with wedges.
- Install rakers in pairs, then brace and lace them together.
Method 2: Erecting Flying (Horizontal) Shores
Flying shores support parallel walls after intermediate removal. Therefore, follow this sequence:
- Fix wall plates to both walls at the required level.
- Install the horizontal shore between the wall plates.
- Add struts and braces to stiffen the shore.
- Tighten all connections with wedges.
- Check the depth and width ratios before loading.
Method 3: Erecting Dead (Vertical) Shores
Dead shores support the upper part of a wall while the lower part is altered. Therefore, follow this sequence:
- Mark the positions of the needles on the wall.
- Cut pockets in the wall to receive the needles.
- Insert the needles through the pockets.
- Support the needle ends with dead shores, jacks, or timber piles.
- Tighten the jacks gradually until the load transfers.
- Check the wall for movement before proceeding.
Method 4: Erecting Trench Shores
Trench shores support excavation faces. Therefore, follow this sequence:
- Excavate to the first support level.
- Place sheeting against the trench faces.
- Install walings against the sheeting.
- Insert struts and tighten them with wedges.
- Repeat the sequence as excavation deepens.
Step-by-Step Erection Sequence
Regardless of shore type, most shoring follows a similar sequence. Therefore, use the following steps as a general guide.
Step 7: Set Out the Shoring
First, set out the shoring positions using a tape measure, line, and builder’s square. Mark the positions of sole plates and posts.
Step 8: Install Sole Plates
Next, place sole plates on firm, level ground. Moreover, ensure they bear evenly and do not bridge soft spots.
Step 9: Erect the Main Members
Then, erect the main members—rakers, needles, or posts—in the planned order. Check plumbness and alignment as you go.
Step 10: Tighten Connections
Now tighten all connections with wedges, bolts, or jacks. Moreover, tighten evenly so the load distributes uniformly.
Step 11: Install Bracing and Lacing
Next, install horizontal and diagonal bracing. For raker shores, always install in pairs and lace them together.
Step 12: Check Plumbness and Level
Then, check plumbness with a plumb bob and level with a spirit level. Correct any error before loading.
Step 13: Inspect Before Loading
Finally, inspect the completed shore before applying loads. Check tightness, plumbness, and bearing. Only after satisfactory inspection should the structure be loaded.
How to Dismantle Building Shores Safely
Dismantling is more dangerous than erection, because the shore is under full load. Therefore, removal must be gradual and controlled.
Step 14: Confirm Dismantling Conditions
First, confirm that the permanent structure can now support itself. Moreover, obtain approval from the engineer or supervisor before removing any shore.
Step 15: Prepare the Area
Next, clear the area below and around the shore. In addition, position props or temporary supports where required.
Step 16: Release the Load Gradually
Then, release the load gradually. For jacks, lower them in small increments. For wedges, tap them gently to ease the load onto the structure.
Step 17: Remove Bracing First
Next, remove bracing and lacing before removing the main members. Consequently, the main members remain stable during removal.
Step 18: Remove Main Members
Then, remove the main members in the reverse order of erection. Moreover, lower them carefully; never throw them down.
Step 19: Remove Sole Plates and Clean Up
Finally, remove the sole plates and clean the area. Then, inspect, sort, and store the components correctly.
Safety Tips During Dismantling
Dismantling demands extra care. Therefore, apply the following tips.
- Dismantle from the bottom up – remove shores in the reverse of the erection sequence.
- Never remove all supports at once – release them gradually.
- Watch for movement – stop immediately if the structure shifts.
- Keep workers clear – maintain an exclusion zone beneath the work.
- Lower components carefully – use ropes or lifting aids.
- Maintain fall protection – use harnesses where working at height.
- Check the weather – stop in high winds or heavy rain.
- Record the work – update the shoring register after removal.
Common Mistakes to Avoid
Many shoring failures result from avoidable errors. Therefore, avoid the following common mistakes.
- Installing shoring from the bottom up instead of top down.
- Using defective or undersized timber.
- Failing to brace raker shores in pairs.
- Neglecting to inspect hydraulic shoring before each shift.
- Bearing shoring on soft or unstable ground.
- Removing shoring before the permanent structure can support itself.
- Releasing all supports at once.
- Ignoring signs of movement during installation or removal.
- Using ladders instead of proper stairways for access.
- Throwing components to the ground during dismantling.
Step-by-Step Summary Table
| Stage | Step | Key Point |
| Preparation | Inspect structure | Identify cause of instability |
| Preparation | Determine shore type | Match shore to condition |
| Preparation | Select materials | Reject defective timber |
| Preparation | Prepare foundation | Firm, level sole plates |
| Preparation | Prepare tools and PPE | Inspect and reject defects |
| Preparation | Plan and brief | Agree sequence and signals |
| Erection | Set out shoring | Mark positions accurately |
| Erection | Install sole plates | Even bearing, no soft spots |
| Erection | Erect main members | Top down, check plumb |
| Erection | Tighten connections | Even load distribution |
| Erection | Install bracing | Pair and lace rakers |
| Erection | Check plumb and level | Correct before loading |
| Erection | Inspect | Record and tag |
| Dismantling | Confirm conditions | Structure can support itself |
| Dismantling | Prepare area | Clear and support |
| Dismantling | Release load gradually | Small increments |
| Dismantling | Remove bracing first | Keep main members stable |
| Dismantling | Remove main members | Reverse erection order |
| Dismantling | Clean and store | Inspect and sort |
Conclusion
Safe erection and dismantling of building shores depend on preparation, sequence, and discipline. When technicians inspect the structure, select the right shore, and install members from the top down, they prevent collapse and protect workers.
Moreover, dismantling demands even greater care, because the shore is under full load. Therefore, release the load gradually, remove bracing first, and never rush the task. As a result, the structure remains stable, and every worker returns home unharmed.
Frequently Asked Questions
In what order should building shores be erected?
Erect building shores from the top down. This sequence keeps the structure supported as work proceeds. Remove them from the bottom up.
Why must raker shores be installed in pairs?
Raker shores must be installed in pairs and laced together. Consequently, the shoring system resists movement in all directions and avoids twisting the wall.
How do I release a shore safely?
Release the load gradually using jacks or wedges. Lower jacks in small increments, and tap wedges gently to transfer the load onto the permanent structure.
When can building shores be removed?
Remove building shores only after the permanent structure can support itself. Always obtain approval from the engineer or supervisor before removal.
What should I do if the structure moves during dismantling?
Stop work immediately, re-tighten the shore, and assess the situation. Then, report the movement to the supervisor before continuing.