
Applicable ASTM Standard
- ASTM D4318: Standard Test Methods for Liquid Limit, Plastic Limit, and Plasticity Index of Soils.
Purpose of Measurement
The purpose of the liquid and plastic limit tests is to evaluate the effect of water content (w) on the mechanical properties of soil, specifically:
- Volume changes.
- Soil consistency.
Applications:
- Classifying soils based on ASTM D2487.
- Estimating the swell potential of cohesive soils.
Definitions and Theory
- Liquid Limit (LL) and Plastic Limit (PL):
- Water contents at which the mechanical properties of soil change.
- Relevant for fine-grained soils, tested on fractions passing the #40 sieve (0.425 mm).
- Plasticity Index (PI):
- The difference between LL and PL: PI=LL−PLPI = LL – PLPI=LL−PL
- PI as an Indicator: High PI values signify high swell potential, often linked to clay minerals such as bentonite, montmorillonite, and smectite.
- Shrinkage Limit (SL):
- Water content at which soil volume begins to change due to variations in water
- Not commonly used in earthwork construction due to safety concerns (handling of mercury during testing).
- Atterberg Limits:
- Collective term for LL, PL, and SL.
- LL and PL are the focus of this test, while SL is measured separately under ASTM D427 but is excluded here for safety reasons.
Relevance of PI to Swell Potential
- Clay minerals with high cation exchange capacity:
- Can bind more water molecules.
- Exhibit a plastic state over a wide range of w and soil volumes.
- Have a high swell potential.
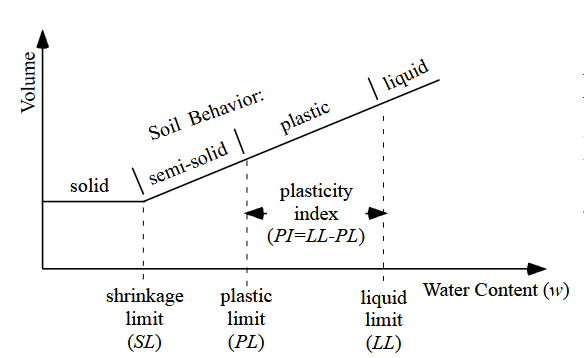
Relationship between volume and water content in fine grained soil. A liquid limit and plastic limit diagram visually represent the relationship between soil water content and its consistency states. The liquid limit (LL) marks the water content at which soil transitions from a plastic to a liquid state, typically determined at 25 blows in a liquid limit test. The plastic limit (PL) indicates the water content where soil begins to crumble when rolled into thin threads. Together, these values help define soil’s Atterberg limits, crucial for understanding soil behavior in engineering and geotechnical applications.
Liquid Limit Test
The following are essential for performing the liquid limit test:
- Fine-grained soil
- #40 sieve (0.425-mm opening)
- Distilled or demineralized water
- Scale (capable of measuring to the nearest 0.01 g)
- Ceramic soil mixing bowl
- Soil drying oven (set at 110°C ± 5°C)
- Frosting knife
- Liquid limit device
- Grooving tool
- 3 soil moisture containers
- Permanent marker (for labeling soil moisture containers)
Plastic Limit Test
For the plastic limit test, the following equipment and materials are necessary:
Permanent marker (for labeling soil moisture containers)
Fine-grained soil
#40 sieve (0.425-mm opening)
Distilled or demineralized water
Scale (capable of measuring to the nearest 0.01 g)
Ceramic soil mixing bowl
Soil drying oven (set at 110°C ± 5°C)
0.125-in. diameter metal rod
Frosted glass plate
3 soil moisture containers
Liquid Limit Testing procedure
The liquid limit (LL) is the water content at which soil begins to behave as a liquid. The following procedure is based on the Multipoint Method (Method A) from ASTM D4318:
Steps:
Prepare Soil Sample:
Sieve the soil through a #40 sieve and collect the fraction that passes.
Mix approximately 50 g of soil with distilled water until it reaches a consistency similar to peanut butter or frosting.
Check Device Calibration:
Ensure the cup’s drop height in the liquid limit device is 1.0 cm.
Use the tab on the grooving tool to confirm and adjust the height if necessary.
Prepare the Soil in the Cup:
Spread a flat layer of soil in the cup using a frosting knife.
Cut a Groove:
Use the grooving tool to cut a groove in the soil.
Perform the Test:
Turn the crank at a rate of 2 cranks per second.
Count the number of cranks needed to close the groove over a length of 0.5 in.
Record the number of cranks.
Repeat for Consistency:
Clean the cup and repeat steps 3–5 until consecutive trials yield consistent results (within a few cranks).
Calculate the average number of cranks.
Determine Water Content:
Remove the soil, place it in a moisture container, and determine its water content using ASTM D2216 (refer to Chapter 2).
Repeat for Multiple Points:
To determine the liquid limit, repeat the procedure at three different water contents.
Adjust the mixture by adding water or soil to achieve the desired range.
Determine Liquid Limit:
Plot the results on a semi-log graph with water content (w) on the y-axis and the number of cranks on the x-axis.
Interpolate the water content corresponding to 25 cranks, which defines the Liquid Limit (LL).
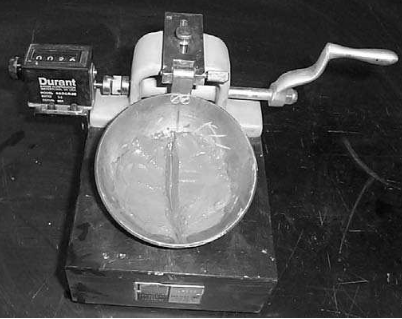
The groove has closed over a length of 0.5 in.
Plastic Limit Test procedure
The plastic limit (PL) is the water content at which a 0.125-in. diameter rod of soil begins to crumble. This is determined using the following procedure:
Steps:
Prepare the Soil:
Pass the soil through a #40 sieve and collect the fraction that passes.
Mix Soil with Water:
Add distilled water to the soil to create mudballs with enough stickiness to hold their shape.
Form a Soil Rod:
Take a pea-sized mudball and roll it onto a frosted glass plate to form a rod with a diameter of 0.125 in.
Use a 0.125-in. diameter metal rod as a reference.
Adjust Soil Consistency:
If the soil crumbles while forming the rod, add more water to the sample and repeat.
If the rod does not crumble, pick it up, re-roll it into a ball in your hands, and then re-roll into a rod.
Determine the Plastic Limit:
Continue the process of rolling and drying the soil in your hands until the rod crumbles while being rolled.
At this point, the water content of the soil is the plastic limit (PL).
Measure Water Content:
Quickly weigh the moist soil and place it in an oven for a moisture content determination following ASTM D2216 (see Chapter 2 for details).
Repeat for Accuracy:
Perform the entire procedure three times and report the average water content as the plastic limit (PL).
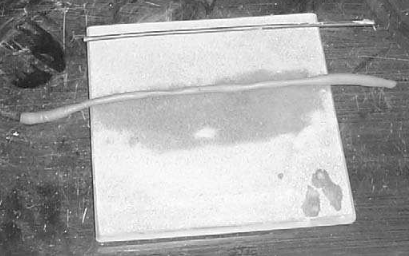
Rolling the soil to form a 0.125 in diameter soil rod without crumbling